Gesture Controlled DMX Moving Head Lights

When I registered for the Light and Interactivity course, one of my goals was to learn more about DMX lighting and how to control it. The final project was the perfect opportunity to create a DMX controller that would be responsive to hand gestures. For this, I used TouchDesigner to parse body tracking data from the Microsoft Kinect and madMapper to receive OSC messages that would change channel values to control the moving head lights.

The video shown below is the first prototype: the X coordinates controlled the Panning channel, and the Y controlled the Tilt.

Bill of Materials

  • Pair of UKING 80 Watt Double Beam Moving Head Lights, $128.78 on eBay

  • Kinect Azure, borrowed from ITP Equipment Room

  • ShowJockey USB -> DMX Adapter, gifted from CHiKA, can be purchased from garageCube

  • ZOTAC ZBox QK7P3000, my NUC PC

  • Rockville RDX3M25 25 Foot 3 Pin DMX Lighting Cable, 2 pack for $10.95 on eBay

Software

  • TouchDesigner 2020.22080

  • madMapper 3.7.4

  • OSC Data Monitor (Processing Sketch), for troubleshooting

System Flow

PC -> Kinect Azure -> TouchDesigner -> madMapper -> DMX moving heads
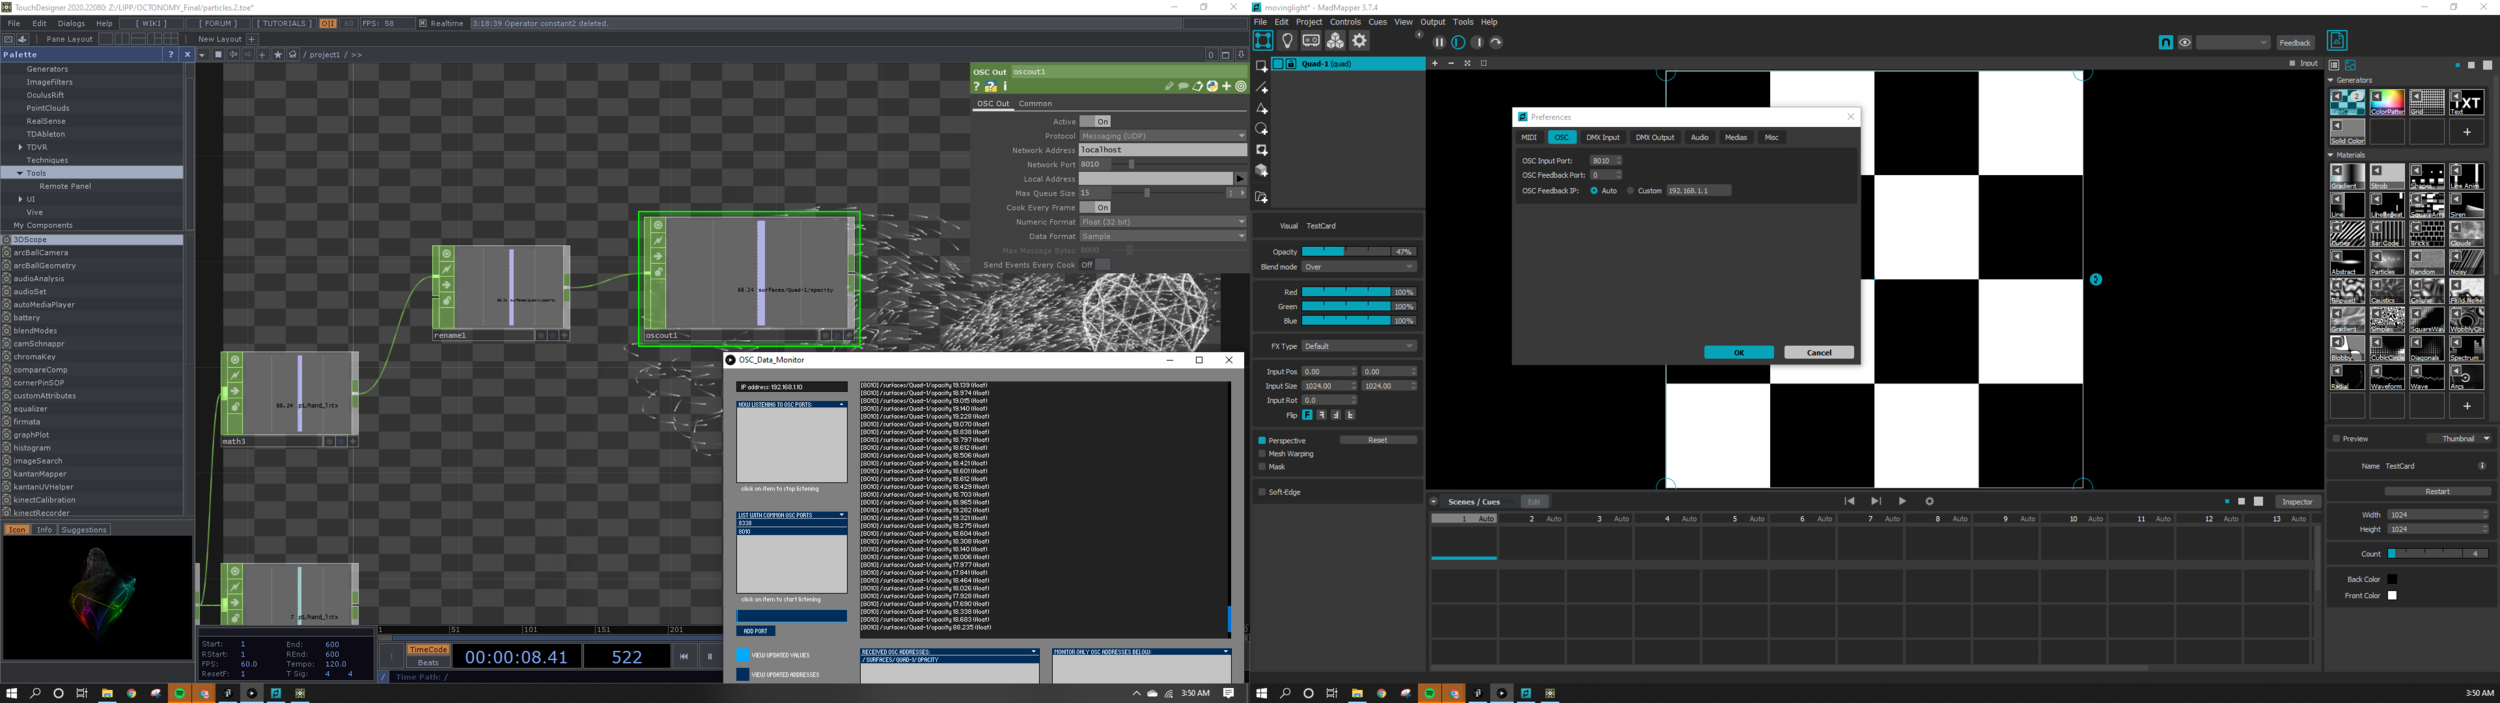
TouchDesigner Setup

madMapper Setup

Screen Shot 2020-04-28 at 4.06.12 AM.png
Screen+Shot+2020-04-28+at+1.45.26+AM.jpg


Roadblocks

ShowJockey USB DMX
TouchDesigner is a powerful tool and includes its own DMX out CHOP, but Derivative built the TD environment with ENTTEC hardware in mind. Tom put together a workaround for DMXKing’s eDMX1 Pro using DMXout via sACN which would send messages to QLC+ for controlling the lights. The eDMX1 Pro uses an FTDI driver which can be recognized with the QLC+ software.

I experienced difficulty finding the specification sheet for the ShowJockey SJ-DMX-U1 device, and could not see which driver it would need. I blindly downloaded the FTDI driver to see if the ShowJockey would then show up, but that did not work. As per Tom’s advice, I checked to see what serial devices my Mac recognized. To do this, I used the Terminal command “ls /dev/cu.*” The ShowJockey did not show up.

Screen Shot 2020-05-03 at 12.54.14 PM.png
Screen Shot 2020-05-03 at 12.51.35 PM.png

When CHiKA gifted me the ShowJockey, we were using it only with madMapper, so I knew that the device was functional in that environment. I assumed that this product on the GarageCube site is what I must have, and its description says "This "NO DRIVER!" DMX controller is plug & play and ready to work with madMapper and Modul8 (only)" For this reason, I decided to use TouchDesigner simply to send out OSC data to madMapper for channel value changes.

OSC Connection
When trying to establish the link between TouchDesigner and madMapper, I knew that OSC would be very straightforward. It’s a matter of matching network ports, setting up the correct network / local addresses, using the appropriate protocol, and making sure the OSC message that is being sent is in the correct format that the receiving software could recognize. When I did not see any changes to the channel values within MM, I used the OSC Data Monitor to make sure that I was indeed sending out an OSC message with TD. Sure enough, I was sending an appropriately formatted OSC message.

TD-OSC_troubleshoot1.PNG

I followed a few tutorials (see references) but they all did not mention a very important thing; Tom pointed out "You'll need to use the address 127.0.0.1 if you're trying to communicate between two programs on the same machine.” Duh. Thanks Tom!

Notes

I picked the UKING 80W Double Beam moving heads as Louise had mentioned in class that UKING had decent reviews. For this project, I favored these lights for their basic functionality and value, however, I was not pleased with the color blending quality. Once I received my order, I used my AKAI APC40 MIDI controller to change channel values within madMapper just to test that the moving head lights were received in working condition.

Final Project Proposal: TouchDesigner DMX Control

A while back, I had plans to complete the fabrication of LOIE, my midterm lighting fixture for my final project, but knew that the sculpture still called for additional CNC work to make a sturdy back plate that everything would mount to. Last week, I started sketching out ideas for another light sculpture, but as some of my ordered items are not showing any clear signs of when they will be delivered, it really makes rapid prototyping and the final design processes much more difficult.

I am thinking that now is the right time to start diving deeper into TouchDesigner, a program that I began to start using when working for Leo Villareal. I am interested in it as a powerful tool for interactive show control and generative visuals. I am planning to create a DMX controller interface within TouchDesigner using gestures to control specific channels of the DMX lights set up on the ITP floor. I borrowed a Kinect Azure from the ER before quarantine began, and I would like to capture the infrared depth data within TD and program it to trigger events, such as sliding the hue values or brightness levels up and down with the wave of a hand.

Here are two inspiration videos that use the Kinect and TouchDesigner to control a moving DMX light.

Out of curiosity, I looked to see if there were any DMX moving lights that were somewhat affordable.

2 Chauvet MiN spots for $225?

2 Chauvet MiN spots for $225?

chauvetdj2.PNG

Lighting Moment: 4 hour Time Lapse

The first time lapse I took was observing the light coming in from my partner’s kitchen windows. This was taken from roughly 4am - 5:30am - unfortunately, the GoPro (at full battery!) died within 1.5 hours. With the GoPro Hero 4, there is an option to use the Night Lapse mode, which adjusts its shutter speed to allow as much light into the camera. In retrospect, I should have kept a standard shutter speed to observe the natural changes without the camera compensating for the amount of light coming into the sensor.

I imagined that the pink over the stove light would slowly fade as the radiant morning light flooded into the kitchen as it typically does. There are quick flashes of the lights from passing vehicles, and slight glimpses into the neighbors’ morning activity.


The second time lapse I took was from roughly 1:30pm to 6:30pm. I set up the GoPro by the window facing southwest towards Willoughby St. With the darkened, gloomy sky, I did not observe dramatic light changes. As the sun went down, the reflections of the windows became more apparent, so it was possible to observe the light coming in from the ITP floor in the same shot as the buildings outside.


Hue Light: Cassette Controller

I transformed an old cassette tape from a thrift store into a Hue Light controller. I embedded a rotary encoder and a push button through the cassette spools, and an OLED screen through which you would see the tape. I included a red LED at the bottom of the cassette to confirm the WiFi connection.

Materials

  • Hue Light system

  • Arduino NANO 33 IoT

  • Rotary encoder

  • Push button

  • OLED Screen

  • Cassette Tape from thrift store


Code

My code can be found on my Github here.
I modified Tom’s “HueBlinkWithJsonEncoder.ino” file, which can be found here.

Because my controller has an OLED screen, I put together a unit test so that I could adjust the sizing and positioning of the text.
The screen will show when it is attempting to connect, when it finally makes the connection, what settings / values are being changed, when the request is sent, and the response code.
I made sure to modify the default “on” state to “true”, brightness to 255, hue to 0 (red), and saturation to 255.
I increased the stepping for the hue values so that picking another color would be quicker.

Assembly

Hue Light: Interface

This week, I was able to successfully control the Hue Lights that were set up on the ITP floor using Terminal. Here is a video turning the Hue lamp on and off with the following Terminal commands:

On:
curl -X PUT -d'{"on": true, "hue":42900, "effect": "colorloop"}' http://172.22.151.181/api/YQWwzjYDMcgI4WlYHbl-ITkV2F17nXqcjkWusDMy/lights/1/state

Off:
curl -X PUT -d'{"on": false}' http://172.22.151.181/api/YQWwzjYDMcgI4WlYHbl-ITkV2F17nXqcjkWusDMy/lights/1/state

After successfully using Terminal to control the Hue lamps, I attempted both Arduino and p5js to make changes.

I used the Arduino HTTP client example sketch, but was unable to turn the Hue light on and off. The Serial monitor only showed that the Arduino was attempting to connect to sandbox370, but did not complete the connection.

Week 2: Lighting Moment

Adjustments.jpeg

11:53pm, Rebecca’s on a rainy Thursday Night Out. There are several lighting moments within this composition. The striking glow from two neon signs in the window exhibit a range of colors: the middle is a dominantly yellow sign that reads MIXED DRINKS with a white border, while the other is a vintage Rollerblade sign. The white semi-sheer curtain diffuses the glow but allows light to seep into the bar’s ambience. The jukebox screams to be touched with a fluorescent yellow coming from the song selections and teal blue accents. The walls are a wash of indigo as a result of the bar pendant Hue lamps. In the upper left corner is the red of the EXIT sign mixing with the indigo creating a soft puddle of fuschia. Through the entrance, the wet streets offer reflective surfaces for the headlights of incoming traffic along Bushwick Ave.

Adjustments.jpeg
IMG_8249.jpeg
Screen Shot 2020-02-12 at 2.27.51 AM.png